Tổng hợp các bài viết triển khai VMWARE vSphere

Tổng hợp các bài viết triển khai VMWARE vSphere

Tổng hợp các bài viết triển khai VMWARE vSphere nguồn từ http://svuit.vn/


Phần I: Hướng dẫn cài đặt và cấu hình VMware ESXi​


Phần III: Hướng dẫn cài đặt và cấu hình Virtual Machine trên VMware vSphere

17.[Lab 3.2] Hướng dẫn cài đặt VMware tools trên máy ảo Linux

Phần IV: Hướng dẫn cài đặt và cấu hình vSphere Standard Switch
18. [Lab 4.1] Cấu hình VMkernel trên vSphere Standard Switch
19. [Lab 4.2] Cấu hình VLAN trunk on ESXi vSphere Standard Switch
20. [Lab 4.3] Cấu hình NIC Teaming ESXi vSphere Standard Switch

Phần V: Hướng dẫn cài đặt và cấu hình vSphere Distributed Switch
21. [Lab 5.1] Create vSphere Distributed Switch on vSphere 6
22. [Lab 5.2] Add ESXi to vSphere Distributed Switch on vSphere 6
23. [Lab 5.3] Manually Add Uplink Adapters to Distributed Switch
24. [Lab 5.4] How to create vSphere Distributed Port group
25. [Lab 5.5] Migrate VMkernel from VSS to vDS without downtime
26. [Lab 5.6] Migrate VM Network from vSS to vDS without downtime

Phần VI: Hướng dẫn cài đặt và cấu hình SAN Storage

27. [Lab 6.1] Cài đặt và cấu hình Stardwind làm Virtual SAN
28. [Lab 6.2] Cấu hình Starwind Virtual SAN with VMware vSphere 5
29. [Lab 6.3] Tạo máy ảo trên SAN giả lập Starwind Virtual SAN
30. [Lab 6.4] Cài đặt Openfiler giả lập SAN cho VMware vSphere
31. [Lab 6.5] Cấu hình Openfiler iSCSI giả lập SAN cho vSphere
32. [Lab 6.6] Kết nối openfiler iscsi vào VMware vSphere cluster
33. [Lab 6.7] Cài đặt VMware VSAN - VMkernel Virtual SAN traffic
34. [Lab 6.8] Cấu hình VMware vSAN-Config Disks in VSAN, Fake SSD
35. [Lab 6.9] Using VMware Virtual SAN and vSphere HA
36. [Lab 6.10] Working with VMware vSAN and vSphere HA

Phần VII: Hướng dẫn cấu hình VMware vSphere High Availiability

37. [Lab 7.1] Cấu hình Cluster HA trên vCenter 5.5 và add ESXi
38. [Lab 7.2] Cấu hình vMotion trên vCenter 5.5 và Migrate VM
39. [Lab 7.3] Config vMotion migrate powered-on Virtual machine
40. [Lab 7.4] Config VMware vSphere 5.5 Cluster High Availability
41. [Lab 7.5] Install VMware vSphere 5.5 Application HA - App HA
42. [Lab 7.6] Deploy vSphere 5.5 Application HA and Hyperic Agent
43. [Lab 7.7] Configure vSphere Hyperic Server and Application HA
44. [Lab 7.8] Test vSphere 5.5 Application HA VM monitoring

Phần VIII: Backup và restore máy ảo trên hệ thống ảo hóa VMware vSphere

45. [Lab 8.1] Hướng dẫn cài đặt VMware vSphere Replication 5.8
46. [Lab 8.2] Cấu hình backup VM bằng vSphere Replication 5.8
47. [Lab 8.3] Recover Virtual Machine by vSphere Replication 5.8
48. [Lab 8.4] Backup & Recover vCenter by vSphere Replication 5.8
49. [Lab 8.5] vSphere Replication 5.8 replicate VM with snapshots
50. [Lab 8.6] Cài đặt VMware vSphere Data Protection 6.0 (VDP)
51. [Lab 8.7] Cấu hình VMware vSphere Data Protection 6.0 (VDP)
52. [Lab 8.8] vSphere Data Protection 6.0 backup Virtual Machine
53. [Lab 8.9] vSphere Data Protection 6.0 Restore virtual machine

How to Restore AD Object using Active Directory Recycle Bin in Windows Server 2012 R2

How to Restore AD Object using Active Directory Recycle Bin in Windows Server 2012 R2

In this article, we’ll learn the steps to restore AD Object in Windows Server 2012 R2. Active Directory Recycle Bin was introduced by Microsoft in Windows Server 2008 R2. But the GUI version was introduced in Windows Server 2012 R2. Through AD Recycle Bin we can restore any Active Directory deleted object without performing Non-Authoritative restore or an Authoritative Restore. This feature was very helpful for Domain Administrators to restore AD object in comparison to Authoritative Restore. Moreover, restore AD Object using Active Directory Recycle Bin is less time consuming.

Steps to Enable AD Recycle Bin in Windows server 2012 R2

1. Open Server Manager and click on Tools option, then click on “Active Directory Administrative Center“.
How to Enable Active Directory Recycle Bin in Windows Server 2012 R2 (1)
2. On Active Directory Administrative console, Right click on itingredients (local) and then click on “Enable Recycle Bin”.
How to Enable Active Directory Recycle Bin in Windows Server 2012 R2 (3)
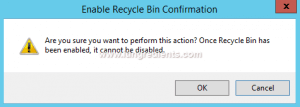
3. After clicking on Enable Recycle Bin we’ll receive the Confirmation dialog box which gives information that, once you enable the Recycle bin after that it cannot be disabled. Click on OK to continue.
How to Enable Active Directory Recycle Bin in Windows Server 2012 R2 (4)
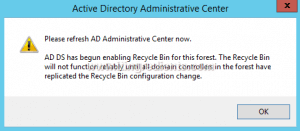
4. It opens the Active Directory Administrative Center console and give notification to refresh the  Administrative center now. It shows some information that AD DS has begun to Enabling the Recycle Bin for this forest. It would not function until it replicates to all the Additional Domain ControllersHow to Enable Active Directory Recycle Bin in Windows Server 2012 R2 (5)
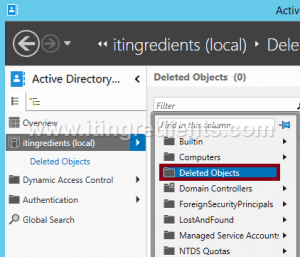
5. By right click on “itingredients (local)” we can see the Deleted Objects option that means the AD Recycle Bin is Enabled.How to Enable Active Directory Recycle Bin in Windows Server 2012 R2 (7)

Steps to restore Deleted AD Object

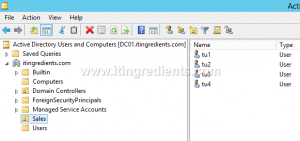
6. We have created a user naming “tu4” under the OU naming “Sales” in Active Directory Users And Computers and now we have deleted that user showing as it is deleted accidentally.
7. A confirmation dialog box appears “Are you sure you want to delete the user named tu4“. Click on Yes to delete a user.
8. The object we have deleted is shown in the “Active Directory Administrative Center”  under the deleted objects.
How to Enable Active Directory Recycle Bin in Windows Server 2012 R2 (12)
9. We can easily restore deleted AD object at their initial location by right click on the deleted AD object and then click on Restore. Here, we can see three other options:
  1. Restore To :- Through  this we can restore the object to the other location.
  2. Locate Parent :-  Before Restore the object through, this option we can locate the original location of the object.
  3. Properties :- We can check properties of the Object such as Object Class, Name, USN etc.
Click on Restore.
How to Enable Active Directory Recycle Bin in Windows Server 2012 R2 (13)
10. As we can see that the deleted user naming “tu4” is restored at their initial location in OU naming sales“.
How to Enable Active Directory Recycle Bin in Windows Server 2012 R2 (8)
Hope you understood the steps to restore AD Object. Please feel free to leave your comments and suggestions in the comment section below.
http://www.itingredients.com/restore-ad-object-using-active-directory-recycle-bin/
How to rename Administrator account using Group Policy in Windows Server 2012 R2

How to rename Administrator account using Group Policy in Windows Server 2012 R2

In this post, we’ll learn the steps to rename Administrator account using GPO in Windows Server 2012 R2. In most of the Organizations, it is recommended to rename the Administrator account. This kind of policy is primarily used in the Organizations to enhance the security. In the old posts, we have already talked aboutGroup Policy Management Preferences, inheritance, etc. Moreover, we have already talked about the Policies to disable Run command,  deploy Software and restrict Software.
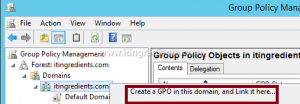
Step 1. To rename Administrator account, open Group Policy Management console.
Right-click on the domain name i.e. itingredients.com in this example and then click on “create a GPO in this domain, and link it here” to create a new GPO.
How to change Domain Administrator Name in Windows Server 2012 R2 (5)
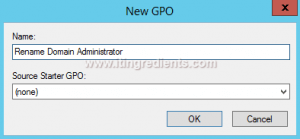
Step 2. In “New GPO” console enter the name of a GPO and click on OK.
We have named the GPO “Rename Domain Administrator” in this example.
You can define any other name as per your preference.
How to change Domain Administrator Name in Windows Server 2012 R2 (3)
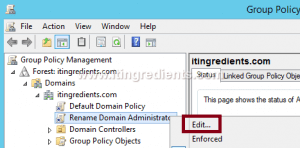
Step 3. Right click on the GPO which we have created (Rename Domain Administrator) and click on Edit. 
A new GPO is like a blank template and we have to edit the GPO settings to define and enable the policy.
How to change Domain Administrator Name in Windows Server 2012 R2 (1)
Step 4.  “Removing All Programs list from the Start Menu” is a User policy.
On Group Policy Management Editor under computer Configuration expand Policies and then expandWindows Settings.
Under the Windows Settings expand Security settings and then click on Local Policies.
Under Local Policies click on Security Options and then right click on “Accounts Rename Administrator account” after it clicks on Properties.
How to change Domain Administrator Name in Windows Server 2012 R2 (8)
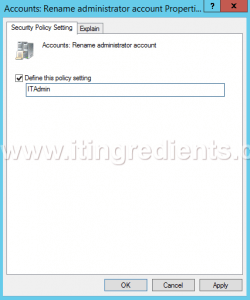
Step 5. On Accounts:Rename administrator account Properties console, select Define the policy settings and we have named ITAdmin.
You can define any other name as per your preference. Click on OK.
How to change Domain Administrator Name in Windows Server 2012 R2 (9)
Step 6. Now, open the command prompt and run command gpupdate /force to update the policy. However, being a Computer Group Policy it might require a restart to apply the Group Policies.

Step 7. Name of the Domain Administrator is changed successfully.
Hope you understood the steps to rename Administrator account using GPO in Windows Server 2012 R2. Please feel free to share your experience, leave your comments and suggestions in the comment section.

How To Reinstall Teamviewer After It Has Expired ?

Here’s a solution to fix this problem :-

1. First uninstall the copy of Teamviewer from your system. This can be done with free uninstallers or by using Window’s default ‘Add or remove‘ program which can be found at: ‘Start’ –> ‘Settings’ –> ‘Control Panel’
2. Click on Start –> Run –> type %appdata% –>delete TeamViewer folder and also delete “C:\\Program Files\\Teamviewer

3. Click on Start –> Run –> type regedit –> delete TeamViewer folder From 
    • HKEY_CURRENT_USER -> Software->Find Team Viewer Enter and Delete.
    • HKEY_LOCAL_MACHINE -> Software -> Find Team viewer Entry and Delet.
4.  Go to C:\Windows\System32\DriverStore\FileRepository and Find Team Viewer Enter and Delete. If in case you are not able to delete ( Permission Issue )then Follow Following step.
    •     Right click on the folder > properties > security tab > advanced >Click on Advance Button 
    • When Click on Advance Button , open one popup menu is like below.
    • Click On Edit Button and type you current user name and click on OK Button
    • Now  Again Right click on Folder  go to Properties -> Security -> Click OnEvery one And then Edit.
    • Now Delete Folder Team Viewer Folder.
5. You can use a free registry cleaner:- for this purpose- CC Cleaner is best or iobit advance system care

6. change MAC address of your Computer.
7. Restart and then install but all step compulsory to follow. If you miss any step it may be not work.

8. If  till your team viewer not working properly then you can try Team viewer Web Log in. it is 110% working fine

How to disable USB devices using Group Policy

In this post we will learn the steps to disable USB Ports Using Group Policy. USB( Universal Serial Bus) is most common use for each and every one. USB is Most common way to establish connection between Pc and USB. Use of USB you can connect Extra Hard disk, Printer, Pan drive,Scanner etc.

Most of case Laptop having 3 to 5 USB post and Desktop having 4 to 6 ports. but If you want increase USB post then you can use External USB hub.

For securing the network of the company, most organizations limit access to removable drives by disabling USB ports.Disable removable disk would prevent the threat of stealing confidential data or inject virus in the network therefore organizations disable USB ports.

In this post we will learn how to disable USB with help of Group Policy and also see how to assign read only permission to USB Drive and block execution of .exe files.

Let's start How to disable USB Devices using Group Policy.

Step 1 :- Launch the Group Policy Management tool on the domain controller, right clickGroup Policy Objects, click New.Give name of GPO and Click On.Example i have assign name of GPO as Block USB Devices.


Step 2 :-Right-click the policy and click Edit. This will open the Group Policy Management Editor group. Go to Computer Configuration \ Policies \ Administrative Templates \ System \ Removable Storage Access. This is the place where the device configuration access toremovable storage. A lot of USB devices for multiple adjustments, however we will set up an environment All Removable Storage classes: Deny access.


Step 3:- 
Right click on the setting All Removable Storage classes: Deny access and clickEdit. If this policy is enabled then access to any kind of removable storage that is connected to the computer will be locked. Click Enabled and click Apply, then OK.

Step 4:- Do you still have to create a Group Policy object, the next step is to link the GPO to the OU container that contains the computer accounts and all USB devices will be blocked. Right-click the OU and click the link current GPO.


Step 5:-From the list select the USB policy GPO Block USB devices and click OK.

 
Step 6:- An upgrade of the group's policy on the client using the gpupdate / force command. Connect any USB device to your computer and you should see the message as access is denied. The policy applied users can not mount any kind of removable media. 

source: https://ravirajsinhv.blogspot.in/2016/06/how-to-disable-usb-devices-using-group.html

Kategori

Ads

Kategori