Tampilkan postingan dengan label CentOS. Tampilkan semua postingan
Cài đặt và cấu hình syslog-ng trên CentOS 6

Cài đặt và cấu hình syslog-ng trên CentOS 6

Khái niệm facility level và secrity level:

Facility level: đại diện cho đối tượng tạo ra thông báo (kernel, process).
acility NumberKeywordFacility Description
0kemkernel messages
1useruser-level messages
2mailmail system
3daemonsystem daemons
4authsecurity/authorization messages
5syslogmessages generated internally by syslog
6lprline printer subsystem
7newsnetwork news subsystem
8uucpUUCP subsystem
9-clock daemon
10authprivsecurity/authorization messages
11ftpFTP daemon
12-network news subsystem
13-log audit
14-log alert
15cronclock daemon
16local0local use 0 (local0)
17local1local use 1 (local1)
18local2local use 2 (local2)
19local3local use 3 (local3)
20local4local use 4 (local4)
21local5local use 5 (local5)
22local6local use 6 (local6)
23local7local use 7 (local7)

Việc sử dụng facility cho phép chúng ta kiểm soát log được dễ dàng hơn, dựa vào nguồn gốc của nó.

Severity levels: xác định một ngưỡng mà messages sẽ được logged
CodeSeverityKeywordDescription
0Emergencyemerg (panic)System is unstable
1AlertalertAction must be taken immediately
2CriticalcritCritical conditions
3Errorerr (error)Error conditions
4Warningwarning (warn)Warning conditions
5NoticenoticeNormal but significant condition
6InformationalinfoInformational messages
7DebugdebugDebug-level messages

Ngoài ra còn một mức đặc biệt được gọi là none, mức này sẽ disable facility đi cùng . Severity levels định nghĩa một số lượng các bản ghi chi tiết trong log file. Dấu sao[*] có thể được sử dụng để miêu tả cho tất cả cácfacilities level hoặc tất cả Severity levels

Cài đặt syslog-ng:

Yêu cầu: 
· Hệ điều hành CentOS 6.x trở lên
· Kết nối internet

Cài đặt EPEL repo:
Code:
[root@myserver ~]# cd /root
[root@myserver ~]# wget http://dl.fedoraproject.org/pub/epel...6-8.noarch.rpm
[root@myserver ~]# rpm -Uvh /root/epel-release-6-8.noarch.rpm
kiểm tra lại EPEL repo đã cài đặt thành công hay không
Code:
[root@myserver ~]# yum repolist
Loaded plugins: fastestmirror
Loading mirror speeds from cached hostfile
* base: mirror.cisp.com
* epel: mirror.metrocast.net
* extras: mirror.symnds.com
* updates: mirrors.easynews.com
repo id repo name status
base CentOS-6 - Base 4,802
epel Extra Packages for Enterprise Linux 6 - i386 8,318
extras CentOS-6 - Extras 12
updates CentOS-6 - Updates 93
repolist: 13,225
cài đặt syslog-ng
Code:
[root@myserver ~]# yum install syslog-ng syslog-ng-libdbi
Loaded plugins: fastestmirror
Loading mirror speeds from cached hostfile
* base: mirror.cisp.com
* epel: archive.linux.duke.edu
* extras: mirror.symnds.com
* updates: mirrors.easynews.com
Setting up Install Process
Resolving Dependencies
--> Running transaction check
---> Package syslog-ng.i686 0:3.2.5-3.el6 will be installed
--> Processing Dependency: libnet.so.1 for package: syslog-ng-3.2.5-3.el6.i686
--> Processing Dependency: libevtlog.so.0 for package: syslog-ng-3.2.5-3.el6.i686
---> Package syslog-ng-libdbi.i686 0:3.2.5-3.el6 will be installed
--> Processing Dependency: libdbi.so.0 for package: syslog-ng-libdbi-3.2.5-3.el6.i686
--> Running transaction check
---> Package eventlog.i686 0:0.2.12-1.el6 will be installed
---> Package libdbi.i686 0:0.8.3-4.el6 will be installed
---> Package libnet.i686 0:1.1.5-1.el6 will be installed
--> Finished Dependency Resolution

Dependencies Resolved

====================================================================================================
Package Arch Version Repository Size
====================================================================================================
Installing:
syslog-ng i686 3.2.5-3.el6 epel 442 k
syslog-ng-libdbi i686 3.2.5-3.el6 epel 31 k
Installing for dependencies:
eventlog i686 0.2.12-1.el6 epel 17 k
libdbi i686 0.8.3-4.el6 base 39 k
libnet i686 1.1.5-1.el6 epel 55 k

Transaction Summary
====================================================================================================
Install 5 Package(s)

Total download size: 583 k
Installed size: 1.7 M
Is this ok [y/N]: y
Nếu hệ thống yêu cầu import GPG key, gõ y để đồng ý
Code:
warning: rpmts_HdrFromFdno: Header V3 RSA/SHA256 Signature, key ID 0608b895: NOKEY
Retrieving key from file:///etc/pki/rpm-gpg/RPM-GPG-KEY-EPEL-6
Importing GPG key 0x0608B895:
Userid : EPEL (6)
Package: epel-release-6-8.noarch (installed)
From : /etc/pki/rpm-gpg/RPM-GPG-KEY-EPEL-6
Is this ok [y/N]: y
Hệ thống đã cài đặt thành công syslog-ng. Nhưng chưa thể chạy được vì mặc định hệ thống đang dùng rsylog.

Cấu hình hệ thống dùng syslog-ng:
tắt rsyslog
Code:
[root@myserver ~]# chkconfig rsyslog off
Kiểm tra lại kết quả
Code:
[root@myserver ~]# chkconfig --list rsyslog
rsyslog 0:off 1:off 2:off 3:off 4:off 5:off
bật syslog-ng
Code:
[root@myserver ~]# chkconfig syslog-ng on
kiểm tra lại kết quả
Code:
[root@myserver ~]# chkconfig --list syslog-ng
syslog-ng 0:off 1:off 2:on 3:on 4:on
Stop Rsyslog
Code:
[root@myserver ~]# service rsyslog stop
Shutting down system logger: [ OK ]
Start Syslog-ng
Code:
[root@myserver ~]# service syslog-ng start
Starting syslog-ng: [ OK ]
Cấu hình syslog-ng nhận log từ các thiết bị trong mạng:
Thêm dòng cấu hình sau vào phần cuối của file cấu hình syslog-ng /etc/syslog-ng/syslog-ng.conf:

Code:
# test log
source s_device {
udp(ip(0.0.0.0) port(514));
tcp(ip(0.0.0.0) port(514));
};

destination d_device {
file(
"/var/log/syslog/$HOST-$YEAR$MONTH$DAY.log"
perm(644)
create_dirs(yes)
);
};

log { source(s_ device); destination(d_ device); };
với cấu hình trên hệ thống sẽ nhận log từ tất cả các thiết bị trong mạng với địa chỉ ip nguồn là bất kỳ, trên port 514, giao thức tcp và upd. Và sẽ đặt file log của thiết bị trong thư mục /var/log/syslog. Tên của file log sẽ được đặt dựa vào tên của máy chủ và thời gian hiện hành của hệ thống.

khởi động lại dịch vụ syslog-ng để thực hiện các thay đổi.

Code:
[root@myserver syslog-ng]# service syslog-ng restart
Stopping syslog-ng: [ OK ]
Starting syslog-ng: [ OK ]
HOW TO UPGRADE PHP 5.3.X TO 5.4.X OR 5.5.X ON CENTOS

HOW TO UPGRADE PHP 5.3.X TO 5.4.X OR 5.5.X ON CENTOS

This tutorial was performed on CentOS 6.5 x86 (32-bit) vps.
Step 1 – Login to your server via Command Line (Putty or Terminal)
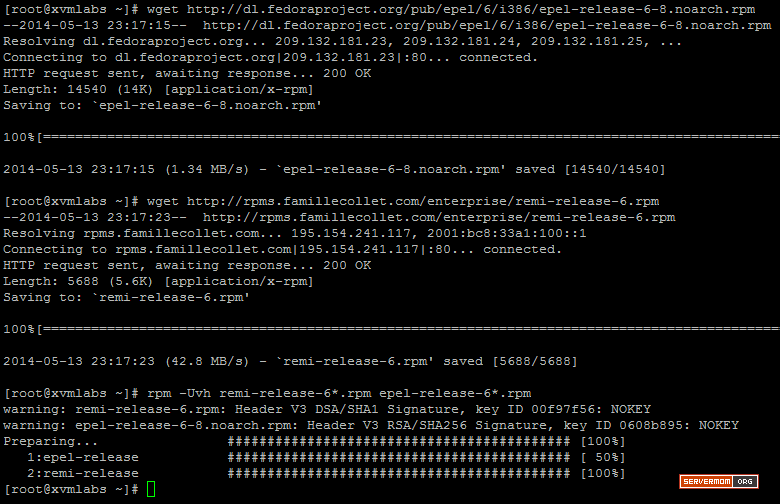
Step 2 – Add EPEL and Remi repositories onto your system:
On CentOS 6.x 32-bit
wget http://dl.fedoraproject.org/pub/epel/6/i386/epel-release-6-8.noarch.rpm
wget http://rpms.famillecollet.com/enterprise/remi-release-6.rpm
rpm -Uvh remi-release-6*.rpm epel-release-6*.rpm
On CentOS 6.x x86_64 (64-bit)
wget http://dl.fedoraproject.org/pub/epel/6/x86_64/epel-release-6-8.noarch.rpm
wget http://rpms.famillecollet.com/enterprise/remi-release-6.rpm
rpm -Uvh remi-release-6*.rpm epel-release-6*.rpm
screenshot:

upgrade-php-centos-1
Step 3 – Now enable your newly added Remi repo. Open the /etc/yum.repos.d/remi.reporepository file using a text editor of your choice – I use Nano:
nano /etc/yum.repos.d/remi.repo
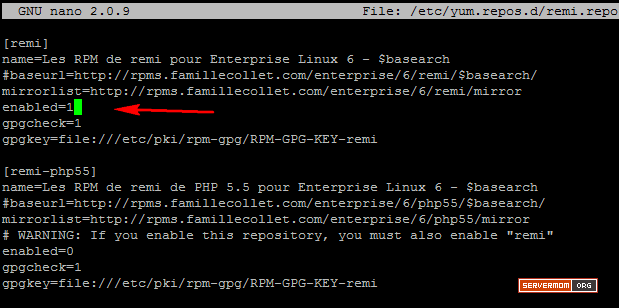
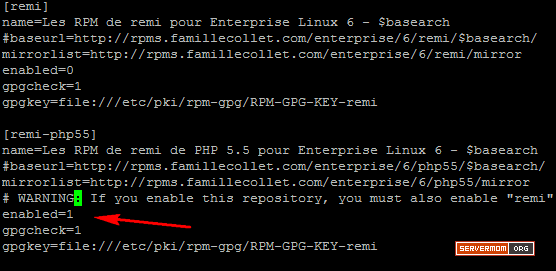
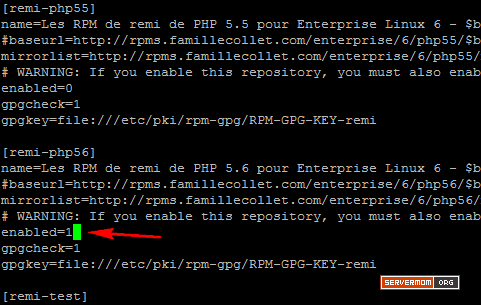
Step 4 – Edit enabled=0 line to enabled=1:
4.a – Update to PHP 5.4, in [remi] section:

upgrade-php-centos-4
4.b – Update to PHP 5.5, in [remi-php55] section:

upgrade-php-centos-4b
4.c – Bonus – Update to PHP 5.6 (beta version), in [remi-php56] section:

upgrade-php-centos-4c
once done, Save changes (Control+O) and exit (Control+X)
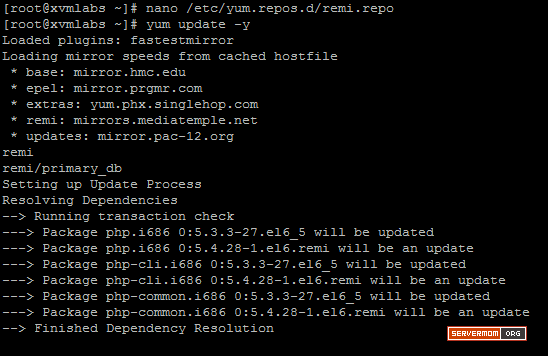
Step 5 – Now update yum:
yum update -y
upgrade-php-centos-5
Step 6 – Done. Now you can check using this command:
php -v
In this example I got:
PHP 5.4.28

upgrade-php54-centos
PHP 5.5.12

upgrade-php55-centos
PHP 5.6.0 Beta 2

upgrade-php56-centos
Now you can test your PHP script on your browser and hope everything still runs smoothly.

PREVENTING THE MESS

You may have to edit old httpd.conf and php.conf (if your srcipt went messed up).
Step 1 – Make backup of php.conf file:
mv /etc/httpd/conf.d/php.conf /etc/httpd/conf.d/php.conf.bak
Step 2 – Then edit httpd.conf  file:
nano /etc/httpd/conf/httpd.conf
Step 3 – You have to find every line with php_ in it, and remove it (or simply add #). If you have found out that there is at least one line per domain, so be sure to remove them all. Once done, save and exit.
Step 4 – Finally restart httpd service (Apache):
service httpd restart
Also, you may also want to upgrade MySQL using this command:
mysql_upgrade -u root -p
source: http://www.servermom.org/upgrade-php-53-54-55-centos/1534/

Cannot retrieve metalink for repository: epel on centos 6

I've got a VM running CentOS 6 (64bit) and I'm attempting to add the EPEL repo like usual to install various packages as I do quite regularly.
Today, I'm experiencing some strange errors yet I'm doing absolutely nothing differently.
I'm adding EPEL like so:
# wget http://download.fedoraproject.org/pub/epel/6/x86_64/epel-release-6-8.noarch.rpm
# rpm -ivh epel-release-6-8.noarch.rpm
Yet when I try running yum for anything, I'm getting this error:
[root@core /]# yum list
Loaded plugins: fastestmirror
Determining fastest mirrors
Error: Cannot retrieve metalink for repository: epel. Please verify its path and try again
Any ideas? I'm stumped!

The correct fix is to update your SSL certificates.
sudo yum upgrade ca-certificates --disablerepo=epel
You need to disable the epel repo so that this command will succeed. After you update your certificates you can use yum normally as EPEL will work again.
How to backup a full Centos Server?

How to backup a full Centos Server?

Method 1:
The best tool to use for this is probably dump, which is a standard linux tool and will give you the whole filesystem. I would do something like this:
/sbin/dump -0uan -f - / | gzip -2 | ssh -c blowfish user@backupserver.example.com dd of=/backup/server-full-backup-`date '+%d-%B-%Y'`.dump.gz
This will do a file system dump of / (make sure you don't need to dump any other mounts!), compress it with gzip and ssh it to a remote server (backupserver.example.com), storing it in /backup/. If you later need to browse the backup you use restore:
restore -i
Another option, if you don't have access to dump is to use tar and do something like
tar -zcvpf /backup/full-backup-`date '+%d-%B-%Y'`.tar.gz --directory / --exclude=mnt --exclude=proc --exclude=tmp .
But tar does not handle changes in the file system as
http://serverfault.com/questions/120431/how-to-backup-a-full-centos-server

Method 2:
Backup Your Server's OS             
Making a backup of your Linux Operating System is a very simple process that uses tools included in every linux installation.                The first step is to create a location to store the backup. For this article we're going to store the backup on the same hard drive as the installed operating system, but you can attach USB devices like thumb drive and external hard drives and even special storage like iSCSI and NFS mounted device to store the backup.      Once you are logged into the server and at a command line make the directory to store the backup in an organized way such as:     
mkdir /backups
Now we will create a compressed version of the Operating System in one single file (tarball) using the tar command.     
For RedHat, CentOS and Fedora or any Operating System based on these linux flavors run the following command:        
tar cvpzf /backups/backup.tgz --exclude=/proc --exclude=/lost+found --exclude=/backups --exclude=/dev --exclude=/sys --exclude=/boot/grub --exclude=/etc/fstab --exclude=/etc/sysconfig/network-scripts/ --exclude=/etc/udev/rules.d/70-persistent-net.rules /   
For Debian or Ubuntu run the following command:         
tar cvpzf /backups/backup.tgz --exclude=/proc --exclude=/lost+found --exclude=/backups --exclude=/dev --exclude=/sys --exclude=/boot/grub --exclude=/etc/fstab --exclude=/etc/network/interfaces --exclude=/etc/udev/rules.d/70-persistent-net.rules /   
Once the command completes the tarball will be located at /backups/backup.tgz            
***HINT: You can change the name of the tarball file with a date identifier and keep multiple versions or "snapshots" of your server's configuration.       
Restore Your Server's OS From a Backup             
In order to restore your server from the previously created tarball the server must have the same Operating System version loaded on it. This particular method of backup and restore is not meant for bare metal projects that need to restore an Operating System to an empty hard drive. It was actually designed to move a configured Operating System from one hardware platform to another, but also works well for rolling back an operating system to a previous configuration.               
Once you have a working Operating System either on a new hardware platform or the same hardware platform move the tarball to the server you want to restore. If you stored the tarball on a USB device or other external storage just reattach the device and mount it. If the tarball is on another linux server use commands like this to copy it to the new server’s hard drive:   
mkdir /backups
scp root@original_server:/backups/backup.tgz /backups            
Of course replace "original_server" with the appropriate IP address.Enter the root users password and the transfer will begin.   Once the transfer has completed run this command to extract the tarball thereby restoring the Operating System that the tarball contains:              
tar xvpfz /backups/backup.tgz -C /
Complete the process with a reboot and troubleshoot any errors that may come up.     
https://www.serverpronto.com/kb/page.php?id=Backing+Up+and+Restore+Your+Server

Method 3:
Ok. The best way to go about this is using rsync. Install rsync on the VPS if it isn't already (probably is).
I am assuming that you have ssh server on the machine where you want the backup (your new VPS?) and that it is listening on the standard port 22.
On the machine where the backup will go, make a new directory called VPSbackup or whatever. Below you can see in the example I assume it is at /home/myuser/VPSbackup.
On your VPS, run:
 rsync -avz --exclude=/proc --exclude=/sys --exclude=/dev -e ssh / myuser@my_ip_address:/home/myuser/VPSbackup
You will then type in the password for myuser when you are prompted, and the backup will begin.
You can also do it in reverse, if you want to use rsync from the local machine (maybe you are behind NAT and/or don't have a public listening ssh server on the backup machine) like so:
rsync -avz --exclude=/proc --exclude=/sys --exclude=/dev -e ssh root@vps_ip_address:/ /home/myuser/VPSbackup
In either case, be patient---it'll take a while :-)
To restore the backup to your new VPS, first install the same version of CentOS on the VPS (just a vanilla install with SSH server) and copy the backup on to it.
From the new VPS:
rsync -avz -e ssh myuser@my_ip_address:/home/myuser/VPSbackup/* /
OR from the machine where the backup is:
rsync -avz -e ssh /home/myuser/VPSbackup/* root@new_vps_ip_address:/
Note that doing it using rsync will copy all the files on your VPS to the VPSbackup directory on the backup machine. If you want everything is one big backup file, then you may want to use tar via ssh like so (on the VPS machine):
tar zcvf - --exclude=/proc --exclude=/sys --exclude=/dev  / | ssh myuser@backupmachine_ip_addr "cat > /home/myuser/VPSbackup.tar.gz"
Then to restore to the new VPS (run this on the new VPS):
cd /
ssh myuser@backupmachine_ip_addr "cat /home/myuser/VPSbackup.tar.gz" | tar zxvf -

http://www.experts-exchange.com/OS/Linux/Q_28429417.html


Kategori

Ads

Kategori