Tampilkan postingan dengan label Backup. Tampilkan semua postingan

Đồng bộ hóa dữ liệu với Microsoft SyncToy

SynToy là 1 phần mềm miễn phí do Microsoft phát triển, có chức năng đồng bộ hóa, sao chép và sao lưu dữ liệu giữa các thư mục. Cụ thể, các bạn có thể đồng bộ dữ liệu của 2 folder nằm ở 2 ổ đĩa, giữa máy tính và ổ đĩa USB, giữa 2 máy tính…
Để cài đặt SyncToy 2.1 yêu cầu các bạn phải cài đặt Microsoft .NET Frameworks V2.0
Link download:

1. Download SyncToy và cài đặt. Click Create New Folder Pair để chọn thư mục nguồn (cần backup) và thư mục đích (nơi chứa bản backup)
2. Chọn các thư mục 
Trên trang kế tiếp, bạn hãy chọn các thư mục mà mình muốn đồng bộ.
Đầu tiên, “Left Folder” là thư mục gốc, có nghĩa rằng bạn sẽ tạo hầu hết các thay đổi trong thư mục này, và các thay đổi đó của bạn sẽ được đồng bộ đến một địa điểm nào đó. Trong trường hợp của thử nghiệm trong bài, chúng tôi đã chọn thư mục gốc là “Documents” nằm trên ổ D:\.
Right Folder” là thư mục sẽ lưu dữ liệu đồng bộ, trong trường hợp thử nghiệm trong bài, thư mục nào có tên “Documents” và nằm trên ổ H:\ (ổ cứng ngoài).
synctoy - left-right folder
3.Phướng thức đồng bộ
Trong phiên bản 2.1, có ba lựa chọn đồng bộ: Synchronize, Echo  Contribute.
Synchronizeđồng bộ giữa 2 thư mục. Bạn tạo/xóa file ở thư mục nguồn thì file cũng được tạo/xóa ở thư mục đích và ngược lại (phù hợp với trường hợp muốn chia sẻ file giữa 2 máy tính hoặc đồng bộ giữa client với server)
synctoy - sync
EchoFile được copy từ nguồn sang đích, sau khi đồng bộ thư mục đích sẽ giống hệt thư mục nguồn (rất phù hợp với backup)
synctoy - echo
Contribute: Hành động này sẽ bổ sung những thay đổi từ Left Folder vào Right Folder. Các file mới hay được cập nhật sẽ được copy từ Left Folder sang Right Folder. Khá giống như Echo, tuy nhiên sự khác biệt ở đây là không có hành động xóa bất cứ thứ gì trong Right Folder.
synctoy - contribute
Nói tóm lại, nếu bạn muốn giữ hai thiết bị hoàn toàn đồng bộ với nhau, hãy chọn Synchronize. Còn nếu muốn một tập dữ liệu nào đó được backup, hãy chọn Echo hoặc Contribute.
4. Đặt tên hành động đồng bộ
Cuối cùng, bạn phải cung cấp tên cho mỗi hành động đồng bộ vừa được tạo của mình.
synctoy - name

5. Cuối cùng là chạy đồng bộ. Từ màn hình chính của SyncToy, chọn cặp thư mục vừa tạo rồi click Run, SyncToy sẽ bắt đầu quá trình copy (nhớ là bạn phải luôn có quyền đọc/ghi lên thư mục đích)
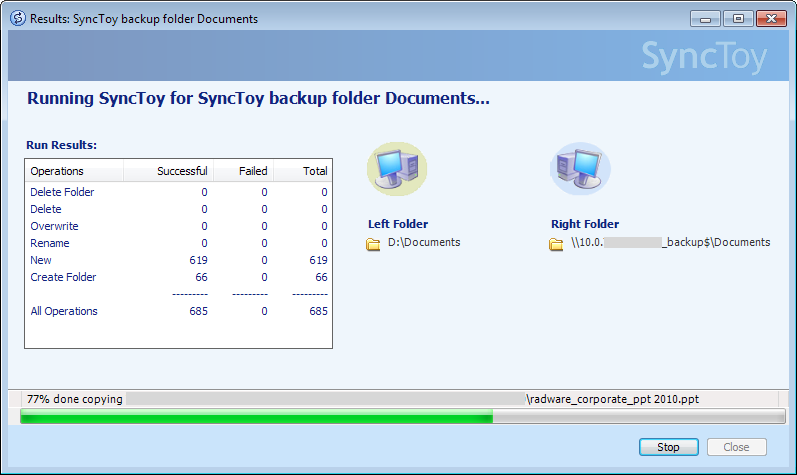
Bấm vào ảnh để xem kích cỡ đầy đủ.
5. Tạo lịch đồng bộ tự động TASK SCHEDULER + SYNCTOY
- Vào mở Task Scheduler lên chọn Creat Task 

- Đặt tên cho Task tại tab General


- tab Trigger chọn chu kì đồng bộ/ backup
- Tab Action: mục action chọn start a program, 
program/script : Click Browse đến file SyncToyCmd.exe trên máy của bạn. Nhớ thêm tham số -R (và tên cặp thư mục nếu chỉ muốn đồng bộ cặp thư mục đó). Click tiếp Next và Finish là hoàn tất
SyncToy có thể chạy ở chế độ command line. Vào thư mục cài đặt SyncToy (thường là C:\Program Files\SyncToy 2.1 nếu cài SyncToy version 2.1) bạn sẽ thấy file SyncToyCmd.exe
Để chạy đồng bộ tất cả các cặp thư mục mở cửa sổ command line và gõ dòng lệnh:
C:\Program Files\SyncToy 2.1\SyncToyCmd.exe -R

Nếu chỉ muốn đồng bộ 1 cặp thư mục cụ thể nào đó thì thêm tên cặp thư mục vào cuối dòng lệnh, nhớ đặt tên cặp thư mục trong ngoặc kép "", ví dụ:
C:\Program Files\SyncToy 2.1\SyncToyCmd.exe -R "SyncToy backup LXT"

Ok đến đây đã tạo xong lịch backup tự động cho sync, lưu ý khi đồng bộ lên server thì user của bạn phải có quyền đọc ghi thì mới đồng bộ được.

Bài viết có tham khảo nhiều nguồn.
Hướng dẫn sử dụng Veeam Backup để sao lưu VPS

Hướng dẫn sử dụng Veeam Backup để sao lưu VPS

Hôm nay mình sẽ hướng dẫn các bạn cách sử dụng Veeam Backup & Replication 7.0  để backup hệ thống sử dụng Vmware Exsi.
 Các bài viết liên quan :
Bước 1 : Add Server để cấu hình Backup
Tại màn hình khởi động Các bạn chọn Virtual machine , sau đó chọn Add Server
Hướng dẫn sử dụng Veeam Backup & Replication 7.0 để sao lưu vps
Điền thông tin server vào ô DNS name ô IP address rồi chọn Next
Hướng dẫn sử dụng Veeam Backup & Replication 7.0 để sao lưu vps 2
Chọn Add sau đó nhập thông tin quản trị server vào ô Username và Password rồi nhấnOK
Hướng dẫn sử dụng Veeam Backup & Replication 7.0 để sao lưu vps 3
Nhấn Finish
Hướng dẫn sử dụng Veeam Backup & Replication 7.0 để sao lưu vps 4
Bước 2 : Tạo Backup
Tại màn hình khởi động Bạn chọn Backup & Replication sau đó chon Backup job
Hướng dẫn sử dụng Veeam Backup & Replication 7.0 để sao lưu vps 5
Điền tên vào ô Name  rồi nhấn Next
 Hướng dẫn sử dụng Veeam Backup & Replication 7.0 để sao lưu vps 6
Chọn Add
Hướng dẫn sử dụng Veeam Backup & Replication 7.0 để sao lưu vps 7
Chọn Server chứa VPS cần backup  rồi chọn vps muốn Backup rồi nhấn Add
Hướng-dẫn-sử-dụng-Veeam-Backup-Replication-7.0-để-sao-lưu-vps-8
Chọn số bản backup Lưu trên đĩa rồi chọn Next 
Hướng dẫn sử dụng Veeam Backup & Replication 7.0 để sao lưu vps 9
Đặt lịch backup định kì : Tích vào ô Run the job automatically  nếu không đặt lich thì nhấn Next
Daily at this time :có các tùy chọn backup hàng ngày , các ngày trong tuần và những ngày do bạn chọn
Monthly at this time : 1 ngày trong tháng
Periodically every : sau mỗi khoảng thời gian cố định
After this job : sau khi backup xong một server nào đó
Nhấn Create
Hướng dẫn sử dụng Veeam Backup & Replication 7.0 để sao lưu vps 11
Nhấn Finish để kết thúc quá trình tạo backup
Hướng dẫn sử dụng Veeam Backup & Replication 7.0 để sao lưu vps 12
Nếu Bạn muốn khởi tạo backup luôn thì bạn Vào phần Backup & replication chọnJob nhấn chuột phải vào phần backup như hình dưới vào chọn Start
Hướng-dẫn-sử-dụng-Veeam-Backup-Replication-7.0-để-sao-lưu-vps-13
Vậy là quá trình cài đặt đã xong. Chúc các bạn thành công !
http://www.slideshare.net/laonap166/hng-dn-s-dng-veeam-backup-sao-lu-vps
nguồn: https://vnitnews.com/huong-dan-su-dung-veeam-backup-de-sao-luu-vps/
Backup of Zimbra MailBox using zmmailbox

Backup of Zimbra MailBox using zmmailbox

This is a short script I use to backup the Zimbra mailbox content for my users.
This has been used on a Zimbra Collaboration Server (ZCS Open Source Edition) 7.2 installation, but should work on earlier versions as well.
I use another script to backup the whole Zimbra installation, but that might be another blog post.

#!/bin/bash -x
# Backup of Zimbra mailboxes using zmmailbox
# Restore of mailbox should be performed using:
# /opt/zimbra/bin/zmmailbox -z -m user@host postRestURL -u https://HOST "//?fmt=tgz&resolve=skip" mailbox-name-date.tgz
BackupFolder="/backup/zimbra"
MailBox="user1 user2 user3 userN"
DateToday=`date -I`
for name in $MailBox
do
sudo -u zimbra /opt/zimbra/bin/zmmailbox -z -m $name@pario.no getRestURL "//?fmt=tgz" > mailbox-$name-$DateToday.tgz
done
The backup files are named mailbox-user1-20120802.tgz mailbox-user2-20120802.tgz …
Backup VMware ESXi using BazaarVCB

Backup VMware ESXi using BazaarVCB

This post describes how you can backup your VMware ESXi home installation with free license usingBazaarVCB if you do not have a vCenter Server available. Bazaarvcb is the fastest backup solution I have used on the free VMware hypervisor.
Download the latest version from the download page.
The backup script is run by crontab every night and looks like this
#!/bin/bash
bazaarvcbPath="/media/backup/bazaarvcb-0.9.7b-linux-i386/bazaarvcb"
backupsPath="/media/backup"
hostname="192.168.0.222"
username="root"
password="password"
rollOut="30"
vmNames="vm-guest1 vm-guest2 vm-guest3"

for VM in $vmNames; do
`$bazaarvcbPath backup -H $hostname -u $username -p $password --roll-out $rollOut $VM $backupsPath/$VM`
done
The backups are full so make sure you have enough disk space available.
bazaarvcb options
$ bazaarvcb -h
usage: bazaarvcb [-h] ...

optional arguments:
-h, --help show this help message and exit

valid commands:
checkhash check .hsh files integrity in one directory
listvm list registered VMs on the ESXi host
queryvm display VMs informations
listbackup
search for backups in local and remote directories
querybackup
display report file of one particular
backup backup a VM
restore restore a backup
Open TCP port 31031 in your firewall to ensure that you have a high transfer rate, otherwise the backup will be transferred over SSH protocol and will be capped in speed to about 7MB/s (on the free hypervisor).
Bazaarvcb cannot backup a VM with snapshot(s).
Warning!
I have not tested this on a host connected to a vCenter server and can not confirm that it will work or not.
Cold backup for the Open Source Edition of Zimbra

Cold backup for the Open Source Edition of Zimbra

Today I’ve setup a cold backup routine to backup my Zimba installation running on my Debian (Etch) 4.0 server that is in full production now for my private domains. This is a slightly modified backup script for the Open Source Edition of Zimbra from the Zimbra Wiki. Please note that the script does a full backup every time it’s being run!
#!/bin/bash

# Zimbra Backup Script
# Requires sftp to run
# This script is intended to run from the crontab as root
# Free to use and free of any warranty! Daniel W. Martin, 9 Sept 2007

# Live sync before stopping Zimbra to minimize sync time with the services down
# Comment out the following line if you want to try single cold-sync only
rsync -avHK --delete /opt/zimbra/ /backup/zimbra

# which is the same as: /opt/zimbra /backup
# Including --delete option gets rid of files in the dest folder that don't exist at the src
# this prevents logfile/extraneous bloat from building up overtime.

# Stop Zimbra Services
sudo -u zimbra /opt/zimbra/bin/zmcontrol stop
sleep 40

# Sync to backup directory
rsync -avHK --delete /opt/zimbra/ /backup/zimbra

# Restart Zimbra Services
sudo -u zimbra /opt/zimbra/bin/zmcontrol start

# Create a txt file in the backup directory that'll contain the current Zimbra
# server version. Handy for knowing what version of Zimbra a backup can be restored to.
sudo -u zimbra zmcontrol -v > /backup/zimbra/conf/zimbra_version.txt
# or examine your /opt/zimbra/.install_history

# Create archive of backed-up directory for offsite transfer
# cd /backup/zimbra
ZimbraVersion=zimbraBackup-zcs-5.0.1_GA_1902.DEBIAN4.0.20080109200914

tar -zcf /backup/$ZimbraVersion-$(date +"%Y-%m-%d").tgz -C /backup/zimbra .

# Transfer file to backup server using passwordless sftp
scp zimbraBackup-zcs-5.0.1_GA_1902.DEBIAN4.0.20080109200914-$(date +"%Y-%m-%d").tgz username@example.com:/path/to/backupfolder/
I’ve described passwordless ssh/sftp session in a earlier post so I won’t describe the last line of the backup script.
Scripts for backup website

Scripts for backup website

#######################################################################
## AURELIEN HUSSON ##
## Script   and  ##
## Info : ##
## Exemple : website find in /home/www/website/public_html/ ##
## backup in /home/www/website/backup/ ##
## The script in /home/www/website/backup-site.sh ##
#######################################################################
#######################################################################
## AUTOMATIC CRON ##
## For automatiq backup ex : eveyday’s 00:01 AM ##
## 01 00 * * * /home/linuxtricks/backup-script.sh ##
#######################################################################
#! /bin/bash
echo We define the system variables
path=`dirname $0`
pathsav=”$path/backup”
site=”www.website.com”
wwwpath=”/home/website/”
wwwfolder=”public_html”
dbhost=”localhost”
dbuser=”user”
dbpasswd=”password”
dbname=”site”
dbrestohost=”$dbhost”
dbrestouser=”$dbuser”
dbrestopasswd=”$dbpasswd”
dbrestoname=”siterestore”
maxjourssauvegarde=”30″
echo Defined variables.
echo “”
echo Checking Programs
progtar=$(which tar)
progtar=$(echo $?)
progbzip2=$(which bzip2)
progbzip2=$(echo $?)
progbzcat=$(which bzcat)
progbzcat=$(echo $?)
progmysqdump=$(which mysqldump)
progmysqdump=$(echo $?)
progmysql=$(which )
progmysql=$(echo $?)
if [ $progtar -eq 0 ] && [ $progbzip2 -eq 0 ] && [ $progbzcat -eq 0 ] && [ $progmysqdump -eq 0 ] && [ $progmysql -eq 0 ]
then
echo All programs are available on the server
else
echo It lacks a program to run the backup script. Check tar, bzip2, bzcat, mysqldump and mysql
exit 1
fi
echo Checking Completed programs
echo “”
echo Installing the script
cd “$path”
mkdir “$pathsav” 2>/dev/null
echo Script initialising
echo “”
echo The backup date we define
dte=$(date +%Y-%m-%d–%H-%M-%S)
echo Backup date defined on $dte
echo “”
echo We launch Backup
echo “”
echo We launch archive website $site
cd “$wwwpath”
tar cf “$pathsav/$site-$dte.tar” “$wwwfolder”
cd “$path”
if [ $? -eq 0 ]
then
echo Archiving website ends : “$pathsav/$site-$dte.tar”
else
echo Failed archive website
exit 2
fi
echo “”
echo It will launch the backup database
mysqldump -u “$dbuser” -p”$dbpasswd” -h “$dbhost” “$dbname” > “$pathsav/$site-$dte.sql”
if [ $? -eq 0 ]
then
echo Backed up database.
else
echo Failed to backup the database
exit 3
fi
echo “”
echo We compress the archive website $site
bzip2 -z “$pathsav/$site-$dte.tar”
if [ $? -eq 0 ]
then
echo Compression archive of the finished website : “$pathsav/$site-$dte.tar.bz2”
else
echo Failed compression archive website
exit 4
fi
echo “”
echo We compress the database.
bzip2 -z “$pathsav/$site-$dte.sql”
if [ $? -eq 0 ]
then
echo Database compressed .
else
echo Failed compressing the database
exit 5
fi
echo “”
echo BACKUP ENDED
echo ———————
echo PURGE OLD BACKUP
find “$pathsav” -name “$site*” -mtime +”$maxjourssauvegarde” -exec echo ‘{}’ \;
find “$pathsav” -name “$site*” -mtime +”$maxjourssauvegarde” -exec rm ‘{}’ \;
if [ $? -eq 0 ]
then
echo Old backups deleted.
else
echo Failed to delete old backups.
exit 6
fi
echo ——————–
echo CHECKING THE BACKUP
echo We check archive “$pathsav/$site-$dte.tar.bz2”
tar tf “$pathsav/$site-$dte.tar.bz2” 2>/dev/null 1>/dev/null
if [ $? -eq 0 ]
then
echo Backup Site Files : OK
else
echo An error occurred during restore. The backup is probably damaged.
fi
echo “”
echo We check the backup database : “$pathsav/$site-$dte.sql.bz2”
bzcat “$pathsav/$site-$dte.sql.bz2” | mysql -u “$dbrestouser” -p”$dbrestopasswd” -h “$dbrestohost” $dbrestoname
if [ $? -eq 0 ]
then
echo Backing up the database : OK
else
echo An error occurred during restore. The backup is probably damaged.
fi
echo TEST COMPLETED RESTORATION

Kategori

Ads

Kategori