Tampilkan postingan dengan label Windows Server. Tampilkan semua postingan

HOW TO BACKUP AND RESTORE NTFS AND SHARED FOLDER PERMISSIONS


HOW TO BACKUP AND RESTORE NTFS AND SHARED FOLDER PERMISSIONS

To backup & restore NTFS permission you will find many utilities like NTBACKUP,  iCacls, Robocopy and FSMT.
Backup and Restore of Shared Permissions:
Generally, shared folder permissions are stored in registry at the following location.
HKLM\SYSTEM\CurrentControlSet\Services\LanmanServer\Shares,
you need to backup and restore this key values using export and import options.
Step 1: Open the registry ( Run | Regedit.exe )
Step 2: Navigate to the following location:
 HKLM\SYSTEM\CurrentControlSet\Services\LanmanServer\Shares
Step 3: Right Click on Shares Registry key in the Left pane, from context menu select Export.
Step4: Give the filename as shareperms.reg

When you want to restore the permissions, copy shareperms.reg file and paste to another server where you want to restore and then double click on that file to import.

USING COMMAND LINE UTILITY.
reg export HKLM\SYSTEM\CurrentControlSet\Services\LanmanServer\Shares c:\shareperms.reg
If you need to restore, copy and paste the file to C: location, just run:
reg import c:\shareperms.reg

Note: After restore you need to restart the Server service.
net stop lanmanserver
net start lanmanserver

BACKUP AND RESTORE OF NTFS PERMISSIONS

If your are using NTBackup to restore the data, you should select the checkbox to restore permissions as well.
Using icacls command to backup NTFS permissions:
icacls d:\sharedata /save ntfsperms.txt /t /c
The /T switch allows it to get subfolder permissions too. The /C switch allows it to continue even if errors are encountered (although errors will still be displayed).
Use this command to restore them:
icacls d:\ /restore ntfsperms.txt


Deny and allow workstation logons with Group Policy

Deny and allow workstation logons with Group Policy

One of the bigger challenges in some Active Directory environments is controlling who is allowed to log into workstations. By default, every user in AD automatically gets added to Domain Users. Domain Users is, once again by default, included in the local Users group on workstations when the workstations get added to AD. That means that unless you take action on either the user account or the computer configuration, any user account in your AD environment can log into any computer whether you want them to or not. If you’re in a smaller AD environment, this may not be a problem for you: you can go to the Account tab in Active Directory Users and Computers, click the “Log On To…” button and specify the computers the user is allowed to use.
Deny logon - ADUC Account tab Log On To
ADUC Account tab Log On To
However, in a larger environment, managing individual accounts can be very time consuming, especially if you have to manually specify computer names for every single user account that needs limited access. You can also run into other authentication problems using “Log On To…” if the account needs to access network resources.
The good news is that there is a Group Policy setting that works with every version of Windows that can be managed with Group Policy from Windows 2000 through Windows 8 that will solve this problem for you. These settings can be found in Computer Configuration > Policies > Security Settings > Local Policies > User Rights Assignment.
Deny logon - Setting in Group Policy Editor
Deny logon – Setting in Group Policy Editor

Deny log on locally ^

The “Deny log on locally” specifies the users or groups that are not allowed to log into the local computer. This policy can be found in Computer Configuration > Policies > Security Settings > Local Policies > User Rights Assignment > Deny log on locally.
Deny log on locally Properties
In my example, I’ve created a special group just for user accounts that I don’t want logging into an OU of computers. However, you can use any AD group here. Just avoid default AD groups like Domain Users or any of the Admin groups if you don’t want to get locked out.

Allow log on locally ^

The “Allow log on locally” setting specifies the users or groups that are allowed to log into the local computer. This policy can be found in Computer Configuration > Policies > Security Settings > Local Policies > User Rights Assignment > Allow log on locally.
Allow log on locally Properties
In my example, I’ve included the local workstation Administrators group, Domain Admins, and an AD group called “Allow Computer Logons.” With this configuration, only user accounts that are members of the local Admins group on the computer or one of the two AD groups are allowed to log in. Just as a reference, here is the default configuration for Windows 7:
Allow Log on locally Properties in Windows 7
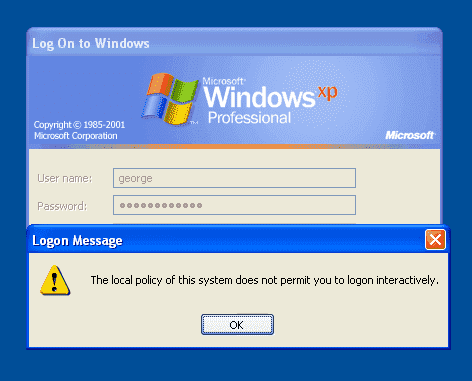
If you happen to be a user that is not authorized to use a computer, here is the message the user will see on Windows XP:
The local policy of this system does not permit you to logon interactively
And here is the error message they will see on Windows Vista or 7 (the message is the same for both except for the OS name):
You cannot log on because the logon method you are using is not allowed on this computer
You cannot log on because the logon method you are using is not allowed on this computer.

Tips ^

The Group Policy Management Console references Microsoft Knowledge Base article Q823659for the Allow log on locally setting. Despite the old-style “Q” naming convention that is referenced, the article is fairly current and still applies to the newer versions of Windows. The KB article gives several examples of harmful configurations and a few more justifications for why you should consider using these two settings.

  • Here are a few things to keep in mind if you decide to implement these settings:
  • DO NOT apply them to Domain Controllers.
  • DO NOT put the settings into either of the default GPO’s for Default Domain Policy or Default Domain Controllers Policy.
  • Deny trumps allow. If a user is in both Allow log on locally and Deny log on locally, Deny always wins.
  • Be on the lookout for software that creates local service accounts that need to be included in Allow Log on Locally. For instance, VMware Workstation and VMware Player have functionality that will not work unless the service account they create is included in Allow Log on Locally.
  • Only apply these settings to sub-sets of computers and not the entire Domain.
reference: https://4sysops.com/archives/deny-and-allow-workstation-logons-with-group-policy/
ACTIVE DIRECTORY RIGHTS MANAGEMENT SERVICES (AD RMS)

ACTIVE DIRECTORY RIGHTS MANAGEMENT SERVICES (AD RMS)

Sau khi hoàn thành xong bài lab này, bạn sẽ làm được:
- Cho user xem được tài liệu nhưng không cho copy
- Cho user xem được tài liệu nhưng không cho in
- Cho user xem nội dung email nhưng không cho copy, in hoặc forward mail


Bài viết được cung cấp bởi MCT TRẦN THỦY HOÀNG

I. Giới thiệu:
- Windows Server 2008 tích hợp sẵn dịch vụ Active Directoy Right Management Services (AD RMS). AD RMS có chức năng phân quyền trên tài nguyên (document, e-mail….)
- Các loại dữ liệu hỗ trợ quyền của AD RMS gồm: MS Word, MS Excel, MS Power Point, MS Outlook phiên bản 2003 và 2007.
- Mục đích bài lab là hướng dẫn cài đặt và cấu hình AD RMS. Bài lab gồm các bước:
1. Cài đặt RMS
2. Cấu hình RMS
3. Phân quyền trên tài nguyên
4. Kiểm tra quyền


II. Chuẩn bị: 
- Một máy Windows Server 2008 đã nâng cấp Domain Controller (trong bài lab sử dụng MS Virtual PC)
- Mở Microsoft Virtual PC, khởi động máy ảo WIN2K3_DC, log on Administrator@nhatnghe.com password P@ssword
- Tạo lần lượt các users trong bảng sau:
RMSAdmin/P@ssword 
U1/P@ssword 
U2/P@ssword 

- Cho user RMSAdmin làm thành viên của group Domain Admins
- Mở Properties user Administrator, điền thêm thông tin E-mail là Administrator@lab.com


- Mở Properties user U1, điền thêm thông tin E-mail là u1@lab.com


- Mở Properties user U2, điền thêm thông tin E-mail là u2@lab.com


III. Thực hiện:
1. Cài đặt RMS

- Mở Server Manager từ Administrative Tools, chuột phải Roles, chọn Add Roles


- Trong cửa sổ Before You Begin, chọn Next


- Cửa sổ Select Server Roles, đánh dấu chọn vào ô Active Directory Rights Management Services


- Trong hộp thoại Add Roles Wizard chọn Add Required Features


- Cửa sổ Select Server Roles, chọn Next


- Cửa sổ Active Directory Rights Management Services, chọn Next


- Cửa sổ Select Role Services, kiểm tra có đánh dấu chọn Active Directory Rights Management Server, chọn Next


- Cửa sổ Create or Join an AD RMS Cluster, chọn Next


- Cửa sổ Select Configuration Database, chọn Next


- Cửa sổ Specify Service Account, chọn Specify…


- Cửa sổ Add Roles Wizard, nhập user RMSAdmin password P@ssword, chọn OK


- Cửa sổ Specify Service Account, chọn Next


- Cửa sổ Configure AD RMS Cluster Key Storage, chọn Use AD RMS centrally managed key storage, chọn Next 


- Cửa sổ Specify AD RMS Cluster Key Password, nhập P@ssword vào ô Password và Confirm Password, chọn Next


- Cửa sổ Select AD RMS Cluster Web Site, chọn Default Web Site, chọn Next


- Cửa sổ Specify Cluster Address, chọn Use an SSL-encrypted connection (https://), chọn Next


- Cửa sổ Choose a Server Authentication Certificate for SSL Encryption, chọn Create a self-signed certificate for SSL encryption, chọn Next 


- Cửa sổ Name the Server Licensor Certificate, nhập tên máy Server (vd: PCxx)vào ô Name, chọn Next


- Cửa sổ Register AD RMS Service Connection Point, chọn Register the AD RMS service connection point now, chọn Next


- Cửa sổ Web Server (IIS), chọn Next


- Cửa sổ Select Role Servics, chọn Next


- Cửa sổ Confirm Installation Selections, chọn Install


- Sau khi cài đặt thành công, cửa sổ Installation Results, chọn Close


Lưu ý: Sau khi cài đặt thành công phải restart máy.


2. Cấu hình RMS
- Mở Active Directory Rights Management Services từ Administrative Tools
- Trong hộp thoại Seciurity Alert, chọn View Certificate


- Cửa sổ Certificate, chọn Install Certificate 


- Cửa sổ Welcome to the Certificate Import Wizard, chọn Next


- Cửa sổ Certificate Store, chọn Place all certificate in the following store, trong ô Certificate store, trỏ đường dẫn đến Trusted Root Certification Authorities, chọn Next


- Cửa sổ Completing the Certificate Import Wizard, chọn Finish


- Trong hộp thoại Security Warning, chọn Yes


- Hộp thoại Certificate Import Wizard, chọn OK


- Trong cửa sổ Active Directory Rights Management Services, bung RMS server (vd: PC01.msopenlab.com), kiểm tra cấu hình RMS thành công.


3. Phân quyền trên tài nguyên
- Mở Windows Exprorer, tạo file C:\Data\tailieu.doc có nội dung tùy ý.
- Mở file tailieu.doc, click vào biểu tượng , chọn Prepare, chọn Retrict Permission, chọn Restricted Access
- Cửa sổ Permission, add U1 vào ô Read, U2 vào ô Change, chọn OK


4. Kiểm tra quyền
- Log on user U1 password P@ssword
- Mở Windows Explorer, vào C:\Data mở tailieu.doc, cửa sổ chứng thực nhập user U1 password P@ssword, chọn OK


- Hộp thoại Security Alert, chọn Yes


- Hộp thoại Microsoft Office chọn OK


- Cửa sổ Microsoft Word, tại thanh Restricted Access chọn View Permission…


- Kiểm tra quyền của U1 trên tailieu.doc


- Tương tự như các bước trên, logon user U2 password P@ssword, vào C:\Data mở file tailieu.doc
- Trong hộp thoại chứng thực, nhập user U2 password P@ssword


- Cửa sổ Microsoft Word, tại thanh Restricted Access chọn View Permission…


- Kiểm tra quyền của U2 trên tailieu.doc


Nguồn: nhất nghệ

http://www.slideshare.net/laonap166/active-directory-rights-management-services-64724594

Kategori

Ads

Kategori